By Bert Beagley-Brown (with a bit of help)
27th Feb 2023
In late 2022 we announced a particularly exciting collaboration with Dorset blacksmith Alex Pole - the TOG Kitchen Axe.
This was one of those ideas that I had in a "lightbulb moment" but then soon realised other people had already had the same idea. Although not that many people. At least I knew that the idea made sense. My thinking was that you could use a small hatchet in place of a meat cleaver (overall length is 350mm) and it would also be useful for making kindling for outdoor cooking over fire. The design, like that of our kitchen knives, combines elements from Europe and Japan to produce something unique.
We made 12 kitchen axes available for pre-order and they sold within 30 mins. We then made another 12 available which sold in a week. This article is a record of the production steps to date. They're not yet finished but I hope it's interesting to see the key steps in the process:
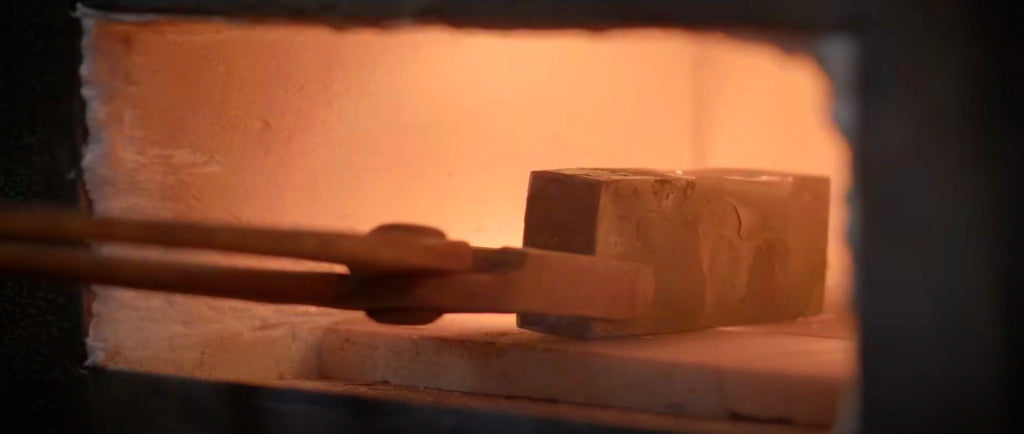
CUT THE STOCK AND HEAT TO 1000ºC
Alex's preferred steel is EN9 (1060) with a 0.6-0.7% carbon content. It is relatively basic to forge, forgiving in the heat treatment and holds a great edge whilst being easily sharpenable. All axes will eventually go blunt over time so he uses a steel that can be re-sharpened at home by anyone with a sharpening stone and a little patience. The stock (a solid bar of steel) is cut with a circular saw to the correct size/weight and then heated to 1000ºC in the furnace in preparation for forging.
FORGE THE ANGLED PROFILE
A bespoke H13 Super Steel tool was created for making the unique axe head shape required for this project. This is attached to the hydraulic press and used to create the fundamental head shape of the axe.
FORGE THE AXE CHEEKS
The initial basic shape is flattened out with the power hammer.
PUNCH THE EYE
The eye is the hole in the axe head that the handle is fitted into. A special shape is created in the head blank so that when the eye is punched in, the correct shape can be produced more easily afterwards.
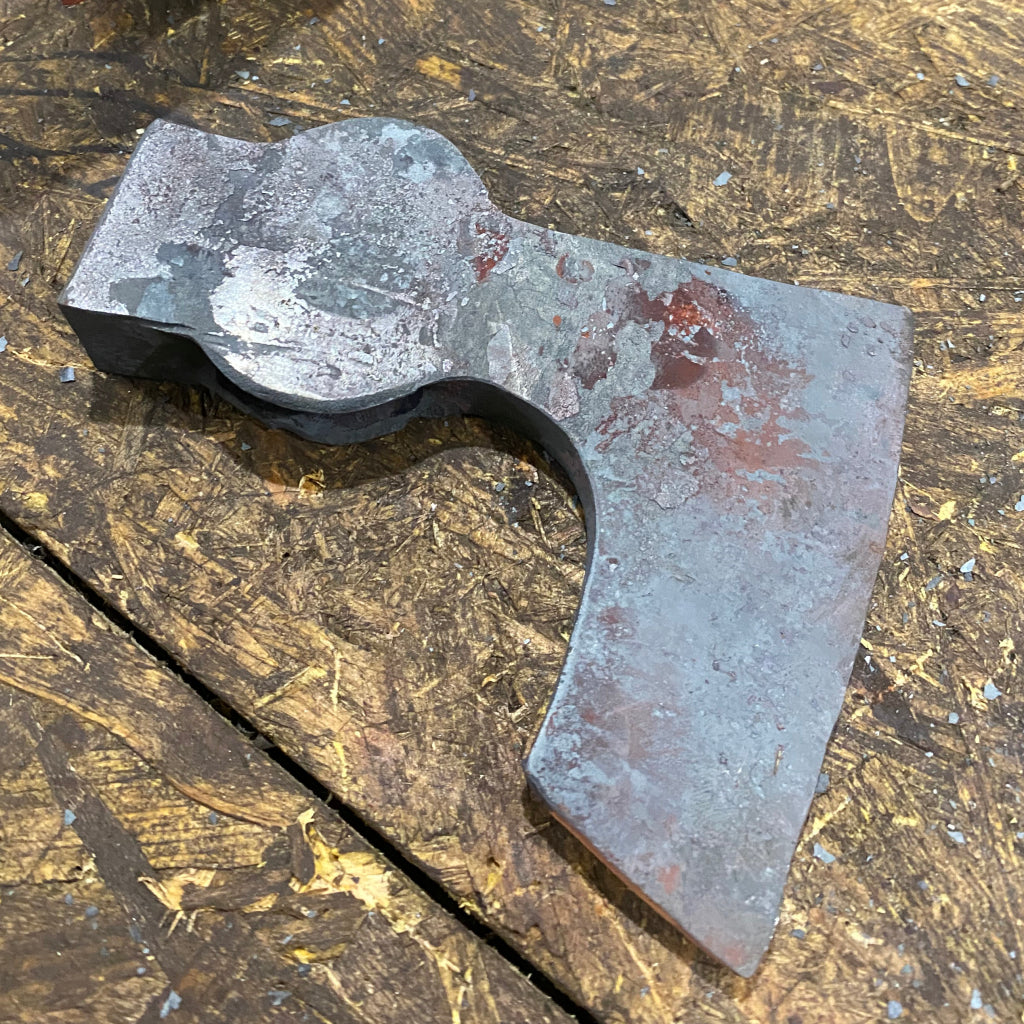

FINALISE THE SHAPE BY HAND
More subtle refinements are made with a hand-held hammer.
GRIND SURFACES
Final surfaces are produced on the axe head by grinding.

HEAT TREATMENT
First the axe head is normalised (annealed) by heating it at a constant temperature for a prolonged period - this released locally built up stresses in the metal. Next, the axe is quenched. Quenching is the process of plunging the hot axe head into warm oil which very rapidly cools the metal, 'fixing' the crystal structure of the metal and making it extremely hard (in fact, too hard so that it's brittle). Afterwards, the metal is reheated and tempered by cooling over a two hour period - this produces the correct combination of strength and hardness for the axe head.
DIFFERENTIAL TEMPERING
Quenched heads are prepared for differential flame tempering which is done with a blowtorch. This results in the cutting part of the axe head being harder than the rear part.

SHARPEN THE EDGE
This is done with coarse then finer and finer belts until a sharp edge is achieved. A convex edge is ground for durability then the very cutting edge is sharpened. A sharp axe can be used for carving wood and for butchery as well as splitting wood.

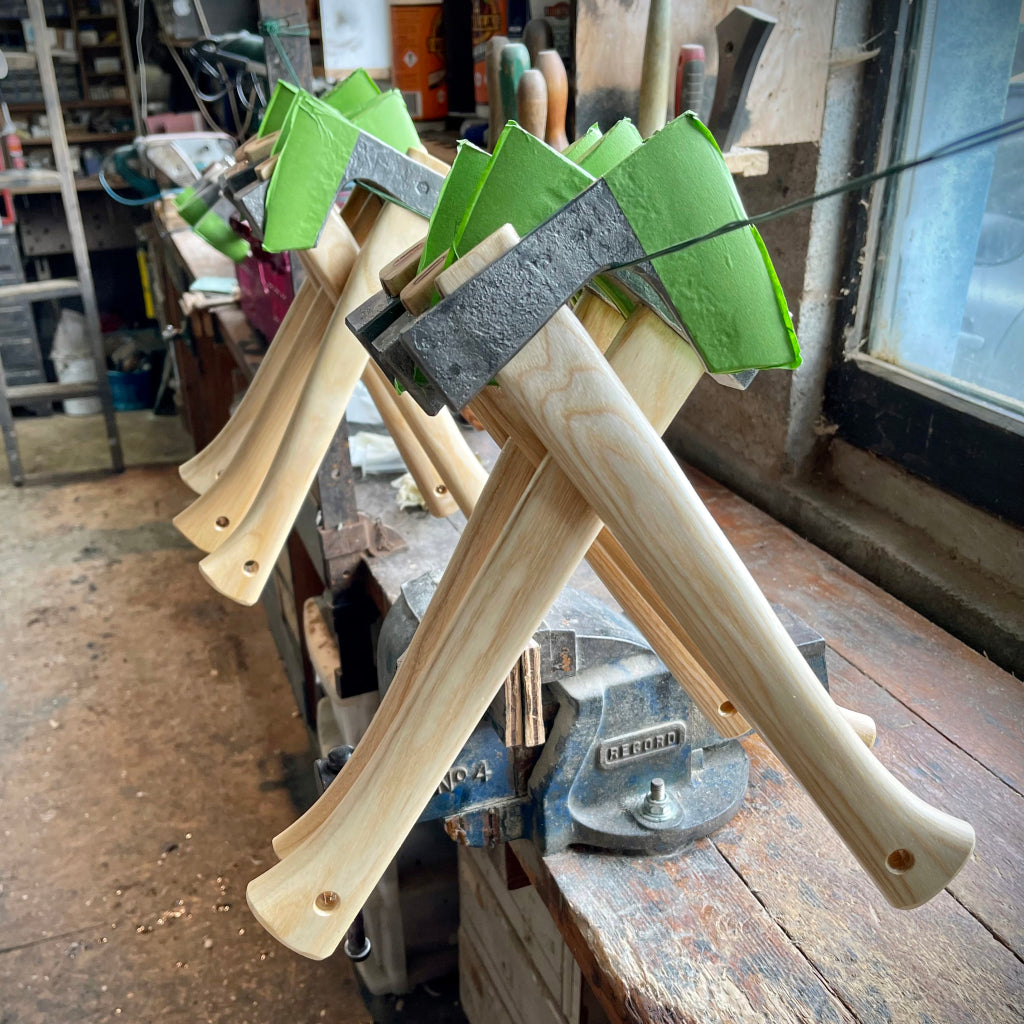
ROUGH CUT THE HANDLE
The handles are made from British Ash which is commonly used for axes as it has a long straight grain meaning very strong, flexible handles that also absorb shock. This locally sourced and native wood is plentiful in the UK making it a sustainable as well as practical choice.
A single prototype handle is produced to define the shape, then the batch are cut out with a band saw.

FIT THE HANDLE
A drawknife is used to shape the end of the handle so that it fits into the eye of the axe head. Sam from The Axe and Edge Tool Company made the handles for the TOG Kitchen Axes.


SHAPE THE HANDLE FOR COMFORT
The final shaping of the handles is completed and holes are drilled and chamfered for attaching the lanyard.

OIL THE HANDLE AND DRY
Tung oil is used to treat the surface of the handles. Tung is food safe, durable, non-tacky and free from harmful chemicals. Saturating the wood with tung oil creates a waterproof finish. The axes are hung to dry.
REMAINING STEPS
The axes are now functional. The remaining steps are to laser engrave the TOG logo, add a rope / lanyard and leather sheath and then package to send to (hopefully) happy customers.


